Showing posts with label Blogger tip. Show all posts
Showing posts with label Blogger tip. Show all posts
Wednesday, November 4, 2009
Note: Best Use Firefox for Editing
If you are using the templates here at OBT, it is best to edit the posts, layout, and page elements in Firefox. They have been designed in Firefox. But they can be viewed in all new-version browsers.

Friday, October 9, 2009
Problems with Comment Form?
If you have any problems on your comment box using templates designed by us, see our previous post on correcting it.
PS: The comment box problem has been corrected in our newer templates.
Saturday, July 11, 2009
Having Problems to Post Comments?
Some of you using the templates here mentioned that visitors can't post comments on their blogs.
See our earlier post about a hack on how to turn on the Embedded Comment Form. This might solve the problem you have.
See our earlier post about a hack on how to turn on the Embedded Comment Form. This might solve the problem you have.
Friday, March 6, 2009
Problems Downloading Templates
If you have problems downloading the templates here, follow these instructions:
We tried it ourselves and it worked! Good luck.
If it doesn't work, see this instructions.
- Download the XML file of the template that you want.
- Open the XML file in a text editor, like WordPad or Notepad++.
- Using the editor search function, find the text 'widget id'.
- All the widget id texts have lines that look like this: '
- Once you're done changing all the numbers in the widget id lines, save the template.
- Then upload the template into your blog from the Layout > Edit HTML > Upload button.
- You're done. Hopefully this works.
We tried it ourselves and it worked! Good luck.
If it doesn't work, see this instructions.
Sunday, February 15, 2009
How to put an Embedded Comment Form?
Here's what an Embedded Comment Form looks like below your posts and other comments.
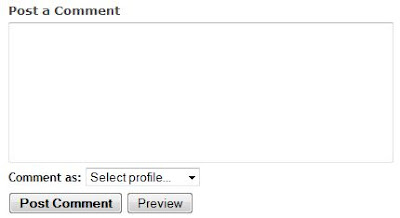
If you don't have it in your blog yet but want to put it in your blog, follow these instructions:
1. Sign in to your blog from the Blogger web: http://www.blogger.com/.
2. Make sure you set the Enable Post Pages to 'Yes' in the Settings > Archiving tab.
3. Go to Settings > Comments tab for your blog. Look for the Comment Form Placement and click the Embedded below post button. Then save your settings.
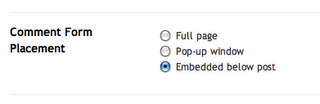
4. Go to Layout > Edit HTML and click Expand Widget Templates.
5. Search for this line in the code:
and below that line add the following line:
6. Save your template and you're done.
If it doesn't work look at some more instructions here.

If you don't have it in your blog yet but want to put it in your blog, follow these instructions:
1. Sign in to your blog from the Blogger web: http://www.blogger.com/.
2. Make sure you set the Enable Post Pages to 'Yes' in the Settings > Archiving tab.
3. Go to Settings > Comments tab for your blog. Look for the Comment Form Placement and click the Embedded below post button. Then save your settings.

4. Go to Layout > Edit HTML and click Expand Widget Templates.
5. Search for this line in the code:
and below that line add the following line:
6. Save your template and you're done.
If it doesn't work look at some more instructions here.
Monday, September 29, 2008
How to install new templates without losing widgets?
It's frustrating to install a new template on your blog if you lose all your widgets. Here's how to avoid this problem and keep your old widgets on the blog when you install new templates. Don't worry, there's no coding involve. You just have to know where to copy and paste codes in your old template into your new template file.
1. Save your current template first
This is a must. Save the old one first just in case something screws up and you need to get back to the old template.
2. Use a text editor
Don't do any coding in the Blogger Editor; it's too easy to mess things up. Get a text editor to do any code tweaking on your computer. If you have no idea what to use, just use Notepad++. Download the latest Notepad++ Installer.exe file. It's free and it makes it easier for you to do your coding.
3. Open up the old and new template XML files in the text editor
Open them up because you'll need to copy some codes in the old template and paste them in the new template files. These codes that you'll copy and paste are basically the codes for your widgets. You don't have to understand what's going on inside the code; you just have to know where it is and what widget it is for.
4. Find out where the codes are located
Look at the image below. See the tag? Click on the image to make it larger. All the codes above this tag are mostly CSS, the type of code that controls the appearance (colors, fonts) of your blog. You don't need to copy/paste anything in this section.
The codes below the tag is the main XML code for your blog. Basically, it's the part that controls the layout (where the sidebars, widgets, headers are) and controls the data flow from Blogger into your blog. This is where all the codes for the widgets you want to save are located.

All your widgets are coded within the tag ... . All the ... tag. The structure looks something like this:
The above is a sample code on how a widget code looks like in a template XML file. The main location of the widget is identified with the div id label. In this case, div id=sidebar-wrapper. Below the div id is the b:section tag. All widgets must be located within this b:section tag. You don't need to worry if you don't understand much about the div or b:section thingy. The important tag you have to know is the b:widget tag. Note that you can put as many widgets as you want inside the b:section tags.
Here's an actual example of a widget tag embedded inside a b:section tag. The location is sidebar-wrapper, meaning that the widget is placed inside one of the sidebars in the blog. The widget is an image widget, as you can see it being labeled id='Image1'.

The most important thing to note is that the widget code starts with the tag and closed with the tag. This is the single most important thing you have to know when copying/pasting later on.Remember also that the widget is placed after the tag and closed with the tag.
Here's another example. The widget is a Linklist widget. You don't have to know the codes inside the widget tag because you won't have to change anything in there.

5. Copy and paste the widgets into new template file
Identify all the widgets you want to keep in your blog after template installation. Locate their codes in the old template file. Remember, these are the codes within the tags at the location of your choice. Make sure the b:widget and b:section tags are closed properly.
If you don't know the div id location you want to paste them in, just put them in any div id, but must be inside a b:section tag. It'll then show up as a widget in the Layout > Page Elements page (as in the image below) and you can then drag and drop the widgets to any new location.

6. Upload the new template as your new blog layout
Once you've pasted all the widgets you want into your new template, upload the new template into your blog using the upload button shown below.

7. If not sure, test this technique on a test blog first
If you're not sure whether it'll work out okay, try it first in a test blog. Create a test blog with a few junk posts (lorem ipsum), create some widgets, and then try changing into new templates using the technique above. See if you can make it work.
------------------------------------
Easy no?
I bet most of those bloggers who use the basic Blogger templates do so because they all got so frustrated of having them widgets gone every time they install new templates. Now you don't have to stick to those basic ones knowing this trick; plus you've got all the templates you ever wanted here in Ourblogtemplates.com (just kidding, or not!).
1. Save your current template first
This is a must. Save the old one first just in case something screws up and you need to get back to the old template.
2. Use a text editor
Don't do any coding in the Blogger Editor; it's too easy to mess things up. Get a text editor to do any code tweaking on your computer. If you have no idea what to use, just use Notepad++. Download the latest Notepad++ Installer.exe file. It's free and it makes it easier for you to do your coding.
3. Open up the old and new template XML files in the text editor
Open them up because you'll need to copy some codes in the old template and paste them in the new template files. These codes that you'll copy and paste are basically the codes for your widgets. You don't have to understand what's going on inside the code; you just have to know where it is and what widget it is for.
4. Find out where the codes are located
Look at the image below. See the tag? Click on the image to make it larger. All the codes above this tag are mostly CSS, the type of code that controls the appearance (colors, fonts) of your blog. You don't need to copy/paste anything in this section.
The codes below the tag is the main XML code for your blog. Basically, it's the part that controls the layout (where the sidebars, widgets, headers are) and controls the data flow from Blogger into your blog. This is where all the codes for the widgets you want to save are located.

All your widgets are coded within the tag
The above is a sample code on how a widget code looks like in a template XML file. The main location of the widget is identified with the div id label. In this case, div id=sidebar-wrapper. Below the div id is the b:section tag. All widgets must be located within this b:section tag. You don't need to worry if you don't understand much about the div or b:section thingy. The important tag you have to know is the b:widget tag. Note that you can put as many widgets as you want inside the b:section tags.
Here's an actual example of a widget tag embedded inside a b:section tag. The location is sidebar-wrapper, meaning that the widget is placed inside one of the sidebars in the blog. The widget is an image widget, as you can see it being labeled id='Image1'.

The most important thing to note is that the widget code starts with the
Here's another example. The widget is a Linklist widget. You don't have to know the codes inside the widget tag because you won't have to change anything in there.

5. Copy and paste the widgets into new template file
Identify all the widgets you want to keep in your blog after template installation. Locate their codes in the old template file. Remember, these are the codes within the
If you don't know the div id location you want to paste them in, just put them in any div id, but must be inside a b:section tag. It'll then show up as a widget in the Layout > Page Elements page (as in the image below) and you can then drag and drop the widgets to any new location.

6. Upload the new template as your new blog layout
Once you've pasted all the widgets you want into your new template, upload the new template into your blog using the upload button shown below.

7. If not sure, test this technique on a test blog first
If you're not sure whether it'll work out okay, try it first in a test blog. Create a test blog with a few junk posts (lorem ipsum), create some widgets, and then try changing into new templates using the technique above. See if you can make it work.
------------------------------------
Easy no?
I bet most of those bloggers who use the basic Blogger templates do so because they all got so frustrated of having them widgets gone every time they install new templates. Now you don't have to stick to those basic ones knowing this trick; plus you've got all the templates you ever wanted here in Ourblogtemplates.com (just kidding, or not!).
Tuesday, August 26, 2008
Menubar for easy navigation
Here's a sample of where a menubar, aka a linkbar, is located - just below the header - easy for navigation. The basic templates in Blogger don't have this menubar.
 All of the templates designed here have been coded to have this linkbar. To add links in the linkbar, go to the Layout --> Page Elements tab and click the Linkbar Edit link (see the red line below). The rest is easy!

 All of the templates designed here have been coded to have this linkbar. To add links in the linkbar, go to the Layout --> Page Elements tab and click the Linkbar Edit link (see the red line below). The rest is easy!
Functional Blog Posts Edit
 Here's a page you'll get when you click on the Layout --> Page Elements --> Blog Posts Edit tab. You might have used a template that didn't work properly in that some of the options you checked in the boxes above didn't show up in your blog posts.
We've fixed all the newer templates so that all these options work fine. All of these templates are labeled BPE ok (Blog Posts Edit ok).
However, the old templates also work fine, except that you might find the boxes "Links to this post", "Show Quick Editing", and "Show Email Post Links" don't show up in the blog posts. No big deal actually, and it doesn't really affect much of your blogging anyway. And the "Links to this post" show up on the post-page below the Comment section anyway, so you won't lose out on that.
If you're using older templates where the Blog Posts Edit Pencil button might not be working. If you want it turned on, read this instruction.
And if your 'Links to this Post' link, or the Backlink, is not working, read this instruction.
Expandable Posts
What is it?
The "Read more..." option (aka "expandable posts") allows you to show a shorter version of a longer post, or a summarized version, in the main page of the blog. The readers can then expand the post to its longer full version in the post-page by clicking the "Read more..." button. This option is great if you have posts that are too long to be shown on the main page.
For this code, the "Read more..." link will only show up for the posts that have been selected to show the link, which is a good thing. There are other versions of the code that won't function properly: the "Read more..." link shows up even if you don't want it to show up.
To get all the templates with this Expandable Posts function, make sure the templates are labeled with Expandable posts.
Most of the new templates here have been added with the 'Expandable Posts' code. You pretty much don't have to do anything much. The only thing you need to do is to separate each post you publish into two parts:
This is how it looks in the Post Editor (with the 'Edit Html' mode):

How to make it easier?
You can make it easier not to type the fullpost-separator tags everytime you post. To do this, go to the Settings --> Formatting tab. At the bottom is the Post Template form. Type in only the code in red above (the fullpost-separator tags) into the Post Template form.
You're done. The fullpost-separator tags will be automatically inserted in the Post Editor everytime you want to post. You can see the tags in the 'Edit HTML' mode to see where to place your posts accordingly.
How to change the "Read more..." text?
You can easily change the text to whatever you want, e.g. "Continue reading...", "[...]", and so on. Just go to the Layout --> Edit HTML tab and click the Expand Widget Templates box. Search for the "read more..." string (the red line below) in the XML code and simply change it to whatever you want. See the example below:

What if I don't want the "Read more..." code?
Delete it. Go to the Edit HTML tab and click the Expand Widget Templates box. Search for the "data:post.body" string (the red line below) in the XML code and delete the code in red only.

The "Read more..." option (aka "expandable posts") allows you to show a shorter version of a longer post, or a summarized version, in the main page of the blog. The readers can then expand the post to its longer full version in the post-page by clicking the "Read more..." button. This option is great if you have posts that are too long to be shown on the main page.
For this code, the "Read more..." link will only show up for the posts that have been selected to show the link, which is a good thing. There are other versions of the code that won't function properly: the "Read more..." link shows up even if you don't want it to show up.
To get all the templates with this Expandable Posts function, make sure the templates are labeled with Expandable posts.
How to use it?
Most of the new templates here have been added with the 'Expandable Posts' code. You pretty much don't have to do anything much. The only thing you need to do is to separate each post you publish into two parts:
- The summary part that will show up both in the shorter version and the full version.
- The other part that shows up only in the full version in its post-page.
Type your summary here
Type rest of the post here
Type rest of the post here
This is how it looks in the Post Editor (with the 'Edit Html' mode):

How to make it easier?
You can make it easier not to type the fullpost-separator tags everytime you post. To do this, go to the Settings --> Formatting tab. At the bottom is the Post Template form. Type in only the code in red above (the fullpost-separator tags) into the Post Template form.
You're done. The fullpost-separator tags will be automatically inserted in the Post Editor everytime you want to post. You can see the tags in the 'Edit HTML' mode to see where to place your posts accordingly.
How to change the "Read more..." text?
You can easily change the text to whatever you want, e.g. "Continue reading...", "[...]", and so on. Just go to the Layout --> Edit HTML tab and click the Expand Widget Templates box. Search for the "read more..." string (the red line below) in the XML code and simply change it to whatever you want. See the example below:

What if I don't want the "Read more..." code?
Delete it. Go to the Edit HTML tab and click the Expand Widget Templates box. Search for the "data:post.body" string (the red line below) in the XML code and delete the code in red only.

Thursday, August 14, 2008
Thousands of new 'gadgets' in Blogger blogs
Blogger has just upgraded their 'widgets' in Blogger blogs (aka Page Elements) into gadgets with all the familiar basic gadgets plus thousands more from third-party gadgets. All of these are available for you if you're using the upgraded Blogger template instead of the classic Blogger template (can't imagine if some are still using the classic templates).
It makes it much more enticing to use Blogger as the blogging platform of choice - easy, free, lots of great free templates (especially at www.ourblogtemplates.com!!!), and now these great gadgets. No need to scrounge/google around for cool gadgets anymore.
Can you think of anything else that'll make Blogger blogs much much cooler and better than how it is now?
I for one wish they'll have an extremely efficient built-in backup tool that lets you save all your Blogger posts, comments, and gadget data into your computer so that you can easily restore everything properly as-it-was in case something bad happens to your blog. For now I'm using a Blogger backup tool from CodePlex, and use the feeds to save the posts, but feeds don't let you resave if you make updates on old posts, and you can't actually restore all the posts as-it-was because they don't keep the Blogger internal format. But in the end, nothing beats a built-in tool (if it's designed to function properly).
How about making this backup tool, Blogger engineers, we'd sure want one :) <--- speaking about a smiley face emoticon, can't you guys put a button up there on the wysiwyg editor that can pull up a selection of emoticons?
Here's a vid on the new Blogger Gadgets in case you missed it on the Blogger buzz.
It makes it much more enticing to use Blogger as the blogging platform of choice - easy, free, lots of great free templates (especially at www.ourblogtemplates.com!!!), and now these great gadgets. No need to scrounge/google around for cool gadgets anymore.
Can you think of anything else that'll make Blogger blogs much much cooler and better than how it is now?
I for one wish they'll have an extremely efficient built-in backup tool that lets you save all your Blogger posts, comments, and gadget data into your computer so that you can easily restore everything properly as-it-was in case something bad happens to your blog. For now I'm using a Blogger backup tool from CodePlex, and use the feeds to save the posts, but feeds don't let you resave if you make updates on old posts, and you can't actually restore all the posts as-it-was because they don't keep the Blogger internal format. But in the end, nothing beats a built-in tool (if it's designed to function properly).
How about making this backup tool, Blogger engineers, we'd sure want one :) <--- speaking about a smiley face emoticon, can't you guys put a button up there on the wysiwyg editor that can pull up a selection of emoticons?
Here's a vid on the new Blogger Gadgets in case you missed it on the Blogger buzz.
Thursday, July 10, 2008
Adding Header Image Without Text
There are some who complained that they had a problem when adding a header image without the Blog Title and Description. This problem happens if you use the templates Perfection, Ultimatum, Tranquility, Grease, and Portrait. Their header image is blocked behind the Linkbar.
Here's a way to solve this problem.
In your template XML file, look for the following CSS code:
To solve this problem, delete the code in red. That's it!
Here's a way to solve this problem.
In your template XML file, look for the following CSS code:
#header a img {
margin: 0px 0px 0px 0px;
padding: 0px 0px 0px 0px;
border: 0;
position: absolute;
top: 0px;
left: 0px;
}
To solve this problem, delete the code in red. That's it!
The problem with the code in red is that it floats your header image and puts it near the tip of your blog. I was using this code for something else, but didn't realize it's there for these newer templates.
If you're still having this problem, just use the External template that doesn't have the problem anymore.
If you're still having this problem, just use the External template that doesn't have the problem anymore.
Monday, July 7, 2008
Fail to Upload Template?
This happened to me just now when I tried to upload my own template using Firefox browser. I got an error message from Blogger.
But it worked fine when I uploaded the template using Internet Explorer browser. So if you have the same problem on Firefox when uploading these templates, try using the Internet Explorer. I don't really know why, but as long as it worked, that's all that matters.
But it worked fine when I uploaded the template using Internet Explorer browser. So if you have the same problem on Firefox when uploading these templates, try using the Internet Explorer. I don't really know why, but as long as it worked, that's all that matters.
Tuesday, May 13, 2008
How to Post Large Photos in Blogger Blogspots
Using the standard "Add Image" button in Blogger's text editor, you can only post photos or images with limited size, even if you choose the "Large Image" option.
Check out this test blog to see how the image fills up the entire post area. If you use the Blogger's Add Image button, the largest image you can post will be much smaller than this.

Follow these instructions to post large photos or images in your blog:
 width="100px" height="100px" />
Check out this test blog to see how the image fills up the entire post area. If you use the Blogger's Add Image button, the largest image you can post will be much smaller than this.

Follow these instructions to post large photos or images in your blog:
- Store your photos in an online image hosting service. I would suggest the free Photobucket powered by Google.
- Copy the direct link to the photo you want to post. In Photobucket, the direct link to your photo is located in the "Direct Link - Layout Pages" tab below your photo.
- In your Blogger Create Post panel, click the Edit HTML in the text editor.
- To post the photo or image, type the code below in the Blogger text Editor:
width="100px" height="100px" />- Change PhotoURL to the actual URL (the direct link) of the photo you want to post.
- Set the width and height of your photos appropriately. If you want it to be the actual size, simply delete the red part. If you just want to set the width and let the height changes accordingly to scale, simply set the width only, not the height.
Monday, April 14, 2008
Blogger Templates Helpful Links
See these links for more help on Blogger templates:
- How to install the template in your blog.
- New*** Use Firefox to edit your OBT templates.
- New*** Problems downloading templates here.
- New*** How to put an Embedded Comment Form in your Blogger blog?
- New*** How to install new templates without loosing old widgets?
- How to use your own header image.
- How to get excellent images for your blog header?
- Try different browser if fail to upload template.
- Browse all the other Blogger templates.
- Browse all the templates compatible with all browsers, including IE6.
- Check out how to turn the Blogger navigation bar on/off.
- How to add the Quick Edit 'Pencil' Button?
- How to add the 'Links to this Post' link, aka Backlink?
- How to move the Blog Title & Description location?
Tuesday, April 1, 2008
Recommend Using Firefox
All of the templates has been tested to be compatible with all browsers, except a few of the old ones that doesn't open up well in IE6 only. These templates have been tested best with Firefox. In some templates, there are glitches when you open the Layout page inside IE7, but the actual blog opens up okay. My recommendation is to use Firefox, or download it for free if you don't have one.
Another problem you might see is that your sidebars are pushed below the Post column. It might be because some elements in your sidebar is wider than the sidebar itself (you won't see this problem if you use Firefox).
Downloading Firefox is extremely easy and takes less than 5 minutes, 10 minutes at worst. It's small in size, faster page-loading time, less crowded on the toolbars, and you can change the theme/appearance anyway you want for free.
Another problem you might see is that your sidebars are pushed below the Post column. It might be because some elements in your sidebar is wider than the sidebar itself (you won't see this problem if you use Firefox).
Downloading Firefox is extremely easy and takes less than 5 minutes, 10 minutes at worst. It's small in size, faster page-loading time, less crowded on the toolbars, and you can change the theme/appearance anyway you want for free.
Moving the 'Blog Title & Description' Location
This guide is meant to be used with the Ourblogtemplates.com designs.
You may see that you have to move the location of your Blog Title & Description (BTD), relative to the header borders or image. For example, if you're using a header image smaller that what was designed for the template and the BTD doesn't appear because it's way down at the bottom of the header border, you then have to move the BTD up. To do this, search for this code:
To move the BTD up or down, change the number in red accordingly. The smaller the number, the higher the BTD location is on the header, relative to its borders and/or header image.
This is just a basic instruction to play around with the BTD location. If you're more familiar with CSS, than this obviously is just a piece of cake :)
You may see that you have to move the location of your Blog Title & Description (BTD), relative to the header borders or image. For example, if you're using a header image smaller that what was designed for the template and the BTD doesn't appear because it's way down at the bottom of the header border, you then have to move the BTD up. To do this, search for this code:
#header h1 {
display: block;
margin: 0px 0px 0px 0px;
padding: 130px 30px 0px 20px;
color: $blogTitleColor;
font: $blogTitleFont;
text-align: left;
}
To move the BTD up or down, change the number in red accordingly. The smaller the number, the higher the BTD location is on the header, relative to its borders and/or header image.
This is just a basic instruction to play around with the BTD location. If you're more familiar with CSS, than this obviously is just a piece of cake :)
Monday, March 31, 2008
How to Change Background Opacity?
You can change the Blogger template opacity/transparency level easily by changing a few numbers in the code. Here's how to do it:
Click on the Layout: Edit HTML tab. Then, search for the code below:
Change the transparency level by changing the numbers highlighted in red. Vary the numbers between 0 to 100 for the line 1, or 0 to 1.0 for the lines 2 and 3. All the numbers must be at the same level, for example 75 for line 1 is equal to 0.75 for lines 2 and 3. The lower the number, the more transparent your blog is. If you don't want it to be transparent, set the values to 100, or 1.0.
Click on the Layout: Edit HTML tab. Then, search for the code below:
#content-wrapper {
margin: 0px 0px 0px 0px;
padding: 0px 0px 3px 3px;
width: 805px;
position: relative;
text-align: left;
background: $blogbgColor;
border-right: 1px solid $blogBorderColor;
filter:alpha(opacity=75);
-moz-opacity:0.75;
opacity:0.75;
}
Change the transparency level by changing the numbers highlighted in red. Vary the numbers between 0 to 100 for the line 1, or 0 to 1.0 for the lines 2 and 3. All the numbers must be at the same level, for example 75 for line 1 is equal to 0.75 for lines 2 and 3. The lower the number, the more transparent your blog is. If you don't want it to be transparent, set the values to 100, or 1.0.
Monday, March 24, 2008
How to Get Excellent Images for Your Blog Header?
To improve your blog design, you can place your own image in the header section, and add your own text to act as the blog title and description, instead of using the default Blog Title and Description provided in the template.
If you don't have any images to use as the header image, you can look at these websites that offer free excellent blog header images. You can follow this instruction on how to place an image on a Blogger's blog.
If you don't have any images to use as the header image, you can look at these websites that offer free excellent blog header images. You can follow this instruction on how to place an image on a Blogger's blog.
Thursday, March 20, 2008
How to Add the Language Translator Buttons?
 Here's the code you can add to create the flag buttons (above) to translate your blog into different languages, depending on which country flag the visitors click. Simply copy all the code below and paste them into a widget (aka a Page Element) and all the 9 flag buttons will appear.
How to Add the Technorati Favorites Button?
Here's a few codes that you can implement to add the 'Add This Blog to My Technorati Favorites' button to your blog. The purpose for this button is to let your visitor s have an easier option to add your blog to their list of Technorati favorite blogs. This increases your blog popularity in Technorati listing.
I'll put down 3 codes for you to choose from, each with a different Technorati Fav buttons. Don't forget to change yourblogname.com to your own blog's URL.
Button 1:

Button 2:
 The Technorati image is rounder for this button.
Button 3:

I'll put down 3 codes for you to choose from, each with a different Technorati Fav buttons. Don't forget to change yourblogname.com to your own blog's URL.
Button 1:


Button 2:
 The Technorati image is rounder for this button.
Button 3:


Subscribe to:
Posts (Atom)